Mastering with Waves Plugins Like A Pro

hey what’s going on out there I’m Sean Divine hope you all are doing well today we’ve got a new video and we’re going to be mastering a track using only waves plugins so this is by request
many of you out there using waves plugins exclusively and you want to know what are some good options and what are some good approaches for mastering a track so this track we’re gonna look at today is an R&B pop track
it’s by James Garlimah and it’s called Free so I’m gonna go ahead and play back a little bit of this and then we’ll talk about what we’re gonna do in terms of the mastering and the plugins we’re going to be using coming your way baby I’m coming your way free we don’t have to run so that gives you a good idea of what we’re dealing with there this is my mix just straight out of the mixed session and you’ll see that we do have some “headroom” I like to have a little bit of headroom to work with in terms of our master
of course this way we’re not going to be clipping the bus you see I don’t have any kind of clipping happening in the mix itself so for those of you who are doing your mixes and masters give yourself a little bit of headroom to work with you don’t have to have a ton of headroom you know I hear people out here saying you need like 6 dB 12 dB below zero
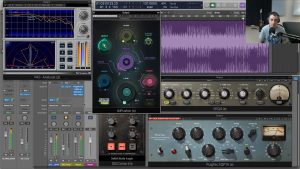
but you know I don’t think it needs to be that drastic but you do want to have something to work with in the mastering the first thing is you’ve got to have a reference point in terms of your levels it’s also good to have some things that are going to show you phasing issues potentially and get an idea of where you’re at in terms of RMS frequencies all I get stuff so I’m gonna pull up the paz analyzer here if I can find it
I have a lot of waves plugins as you can see so we’re gonna go to the paz analyzer there and up here we’re gonna have our frequency spectrum and then we’ve got a representation of phase and then we’ve got our levels over here I’m gonna switch the detection to RMS and we’ll turn the response down a little bit slower here so the next plugin we’re gonna put on here and this is something that we’re just gonna kind of park for a minute
we’re gonna come back to it but I’m gonna put the IMPusher on here and this is a great brick wall limiter mastering plug-in again gonna be the the last thing in the chain right before the analyzer and right now all we’re really doing is we just want to make sure that we are keeping things below 0 and we’re letting this act as a brick wall meaning we’re not gonna go above we’re not gonna distort and so I’m just gonna leave that there I may do the push control which this is just kind of like a threshold on a limiter I’m gonna maybe give it a DB there and then we’re gonna come back to this plug-in but if we play it now so you can see the gain reduction as I bring that pushup and
we’ll adjust that level once we have our other additive plugins meaning when we do an EQ and we boost some of the high-end maybe we use another plug-in to boost the low-end we want to go ahead and do that first and kind of see where we end up before we start reaching for this push control and
you know getting our levels to a louder place so let’s go ahead and let’s throw on a an EQ that’s gonna help us accentuate this beastly low-end that James has gotten this beat very very heavy and what I’m gonna do for this task is one of my favorites and it is the PuigTec the EQP1a this is a model of the poll tech
as many of you probably know the pull text alley cues are excellent for dialing in low-end and giving 808 s– and low kick drums a little bit more boom and thunder so we’re gonna go ahead and we’re gonna bring the low frequency control down to 30 Hertz setting it this low on this plugin just has a nice rumble to it so we’re gonna boost this just maybe 2 or 3 DB maybe less let’s see one thing I want to point out with this plug-in if I turn the boost off and everything’s just zeroed out this plug-in gives things a nice saturation without touching anything so this is without so you can hear as soon as I turn it on it gave us just a little something little vintage flavor but yeah
AFFORDABLE AUDIO MASTERING – GROOVEPHONICS MASTERING AND MIXING
let’s go ahead and let’s do about two DB to and a half dB at that thirty Hertz range coming your way baby I’m coming your way nice now let’s do some additive EQ here let’s go ahead and directly after that let’s go and maybe try the VEQ I like the the VEQ4 for doing a very high kind of sizzle sort of booster this is just adding some air we’ve got this 15 K here on our high frequency you can control
so I’m gonna crank that all the way to 15 and let’s just let’s kind of play with it and see what we can do just to brighten the overall mix a little bit baby I’m coming so you can hear as I went a little bit too happy with it got a bit too bright so I just brought it back and let’s just hear that with them without brings out the hi-hats gives a nice presence to the vocal so now one thing I’m going to do before we get to the IMPusher is I want to go ahead and we’re going to do a little bit of parallel processing and we’re gonna use the SSL buss comp
great compressor for this purpose and so what we’re gonna do is we go over to mix channel we’re gonna go to bus one and we’ll just call this SSL comp we’re gonna do a mono parallel comp for this so we need to go to our input here we are sending a stereo bus here but we’re gonna switch this to a mono signal so that we’re processing this in mono and I’ll show you why and we can hear why in just a second but let’s go ahead and go to the mono version of the plug-in and what we’re gonna be doing here is
I’m gonna solo it I’m gonna send this 100% or at zero down here and we’re gonna be smacking this thing pretty strong so it’s gonna be a very very compressed signal all right so it’s just squashed and it has a very warm tone by pushing that analog button and just the tone of the G master bus comp it just has a very analog you know vintage vibe to it and that’s what we’re trying to get and we’re gonna get a little bit of a an increase with our vocal
this is also gonna help with giving us a strong sound in terms of our Mono compatibility so what we’re gonna do is we’re gonna just take this all the way to zero and we’re gonna mix it in and this is gonna be very subtle you don’t want to get overboard with this because it will actually ruin your mix and your your master here so this is just something that you got to be really really careful and delicate about how you mix this in so you can hear I’ve got it makes pretty low in there but when I turn it on it just brings the vocal up just a tad
helps the whole master sound a little bit more glued so we’ll pull that back just a touch I want you all to hear the effect we would probably be even more careful with it but that sounds pretty good so now let’s go over it to our IMPusher the the last a little bit of icing on the cake this is a great great plugin for master processing a lot of cool controls that are catered specifically for getting that last little bit out of your master so first thing let’s do is let’s go ahead and go down to this low control and what we can do is we can select a frequency and
in this case I’m going to try and select the fundamental or something close to the fundamental normally I’d pull up a MIDI keyboard but for sake of time let’s just see if we can look on our analyzer I’m seeing a spike here about 62 so let’s just assume that that’s gonna be the fundamental frequency and so let’s accentuate that and let’s just boost that just a touch so no explanation needed for this is just a little bit of magic
let’s see if we can add some added a little bit more high-end and now I’m gonna go over to our imager and we’re gonna widen things just a bit because this is a cool mix with some elements that are dancing around so we want to make this more exciting for our headphone listeners so as I stress on the channel you want to be really careful about your imaging especially in the mastering process you know if you go like this it’s gonna be you can see more phase being introduced to your anti phase so we want to bring that back keep it in check so I’m gonna add just a little bit of low-mids
I’m just hearing a little something missing and then we’ll get back to that leveling let’s go here to our VEQ4 and I’m gonna go and we’re gonna boost it about eight hundred I love this eight twenty little frequency hit here on our view nice and now finally let’s jump back over to our push control or what is commonly referred to as a threshold on a master limiter
we’re just bringing the level up gonna make it more impactful and if you have any questions about where you should be trying to get your master master levels I’m gonna put a video up in the corner that talks about RMS true peak as well as LUFS and how you can use these to measure your loudness and get it to a point that’s gonna compete commercially
for now I’m gonna be looking over here at our RMS and trying to get it at about -9 -8 somewhere in there is going to be competitive I don’t want to push it too much more than that as you can hear we start to get a little bit of crunch if I go above that and the more you do this the more you’re gonna be able to hear when that starts to react in a not pleasant way
and you’ve got to be really careful about how much gain you introduce here at this stage of your mastering because our master limiter can start to really wreck your dynamics if you start to try and push it too much so it’s just a matter of finding the sweet spot where you’re gonna have a competitive level but you’re not affecting your dynamics and transients in a negative way
so that sounds pretty good there now let’s go back now that we’ve done all of our mastering with our waves plugins I’m going to turn all these off and then I’ll turn them back on so we can get an idea of all the work we did here alright y’all so some folks out there gonna say oh it sounds just louder because it’s mastered but we’re definitely accentuating some of the strong frequencies that the low-end that we want to bring out that 808 that’s just knocking really hard now with the help of our Puigtec EQ as well as this low control on the IMPusher
and then we’ve got some nice high-end added with the VEQ4 we did a little bit of parallel processing with our SSL buss compression and then we subtly mix that in with a mono signal just to give us a bit more impact and glue to our sound and then finally we kept an eye on everything in terms of our levels we’re hitting at about -9 RMS which is going to be competitive and we didn’t overdo the brick wall limiter or the threshold the push
here on this control to the point where we started wrecking our dynamics and taken away from the impact of the transients in this beat so I hope this helps you if you have any questions about the plugins we use or mastering with other waves plugins feel free to leave a comment below if you learned anything in the video please like subscribe and consider sharing and we’ll talk to you soon
First viewed at Mastering with Waves Plugins Like A Pro